


 Inglés (pdf)
 Articulo en XML
 Referencias del artículo
 Enviar articulo por email
 Citado por SciELO
  Similares en
SciELO
Similares en
SciELO 
 Permalink
I. Introduction
NOWADAYS, robots are increasingly present in society, providing the user with a great multitude of applications and utilities, either in professional industry or in daily life. Over the last few years, this has resulted in education emphasizing the teaching of different fields derived from it, such as engineering, mathematics or computing, originating a new teaching methodology named STEM (Science, Technology, Engineering, Mathematics). STEM is based on integrated learning of all scientific disciplines, mainly through problems and open and unstructured situation solving, using the contents and procedures of these disciplines in conjunction.
In addition, the goal of this STEM methodology is that the students work in the classroom in a similar way that an engineer does when facing a problem, promoting the implementation of their knowledge. Furthermore, the reverse process is also achieved, as facing real situations complements theoretical concepts, improves their motivation and broadens the contents of various scientific subjects. This provides the students with a longer learning retention, the ability to transfer among situations and, ultimately, basic learning skills.
Robotics can be effective in teaching STEM ;1; ;2; because it enables real-world applications of the concepts of engineering and technology. The study by Benitti ;3; suggests that educational robotics usually acts as an element that enhances learning (although this is not always the case). Jara et al. demonstrated that robotics subjects are always greatly improved when classroom teaching is supported by adequate laboratory courses and experiments following the ”learning by doing” paradigm ;4;. Robotics is increasingly being taught in schools, even at earlier stages as suggested by ;5;, but teachers face a lack of tools to teach it.
Besides, mobile technology (especially combined with tablets and smartphones) provides a new way of using all the utilities that the Internet and computers have in a more versatile way, thanks to all the available sensors and tactile interfaces on them. This way, students can use them and enjoy a much more interactive and effective learning.
In this article, we present a new way of learning the robot basics by mixing the concepts of STEM methodology and mobile applications. The result is an interactive way of learning where the student can manipulate an industrial robot from a tablet and see how the different configurable parameters (speed, type of movement, orientation interpolation, etc.) affect the trajectory created. Therefore, they can program robot tasks with no knowledge about the specific robot programming language, but by applying general robot concepts. Students also have the possibility to see the transcription in the specific robot language once a program has been created.
This is achieved by an application called Hammer, developed at the Universidad Politécnica de Madrid, installable on any tablet running the Android operating system. Hammer allows new users to experience a first contact with industrial robots, which are usually controlled by complex devices that are difficult to use by non-professionals in the sector, this program being the only one available in Android devices that promotes learning of this kind of robot.
The Hammer application is composed of two main components: a teach pendant interface and a visual-programming interface. The first one allows the user to move the robot in different coordinate systems, run simulations of the real robot, create trajectories in a 3D environment and set robot properties such as speed, type of orientation and type of movement. The second component is bound to create a task by using visual programming (drag and drop of blocks in a Scratch way ;6;). The user can also run a simulation of the program created to test it before executing it in the target robot. When executing the program in the real robot, the communication between the Android device and the robot is achieved through a gateway, which decodes the instruction into the robot language and executes the task.
Several exercises have been designed to use Hammer as a teaching tool and the first experiences are presented in this paper. In general, we have experienced that students get a better understanding of complex theoretical and abstract concepts with this methodology in an easy and enjoyable way. At the same time, students can achieve simple robot tasks in a very small period of time because the use of Hammer does not require learning the target robot programming language.
The rest of the paper is as follows: section II presents the state of art related to mobile apps for teaching Robotics. Section III describes an overview of the main features of Hammer from the point of view of education. The practical sessions are shown in section IV, and the results and discussion can be found in section V and VI. Finally some conclusions are drawn in section VII.
II. State of the Art
Robotics has a lot of potential in education. The world has an increasing population of robots (e.g. healthcare or agriculture) that need people able to control and program them. End-users could benefit from being able to give robots new tasks ;7;. But this is not an easy task. And it is not an easy task to learn.
Mobile applications and visual programming can help with that. Visual-programming software has gained momentum in the last few years because it is an easy and intuitive way to program robots. Although there are not many developments at the moment, we could cite a few. Ruru ;8; is a visual language and environment for novice robot programming. Ruru provides a live and concrete environment in which to learn robotic programming. It is live, i.e. its visualisations are animated in real time and can be edited in real time while the robot is operating. It uses visual representations of robot sensors and actuators that the user can interconnect to create behaviours. Visual-programming has also been used with the Sphero robot ;9;, concluding that “visual programming language (VPL) can also be suitable for robot programming. Furthermore, the main advantages derived from the use of a VPL in such context, when compared to a textual programming language, include a more intuitive and enjoyable programming process, a greater ease of use of the development environment and a better understanding of the tasks to be performed by the robot when viewing the block diagram that specifies a program”.
Arts&Bots ;10; uses craft materials, a flexible hardware kit, an interactive software environment and adaptable curriculum to empower students to create sculptures with robotic actuation and sensing. The software environment is called “CREATE Lab Visual Programmer”, and it is used to perform the storyboarding-step by defining robot behaviours by joining expressions and other program elements into combinations of robot actions that occur over time.
Pichler et al. use augmented reality to facilitate communication and interaction between the operator and robot ;7;, i.e. by illustrating in a transferred camera image which objects the robot has already detected by itself. The simulator visualises what the robot plans to do, and in this way, the user is also aware of the plans of the robot.
Besides, most smartphone applications related to robotics are primarily focused on mobile robot control. These are applications that remotely control the position of the robot and send the position to the phone ;11;. There are applications that report the environmental conditions where the robot is moving, for example, vibrating the smartphone when the robot is close to an obstacle ;12;. However, in some cases, the smartphone, due to the large number of sensors it has, is used as a sensing and monitoring unit ;13;. It is clear that the main use given to the robotics smartphones applications is for control and monitoring, which allows students to acquire a very basic and simple knowledge about robotics devices.
In the last few years, robot manufacturers have begun to include tactile devices to control their robots, like Universal Robot with its tactile pallette*, or Comau with its PickAPP application**, an intuitive interface for robot programming for Android tablets. Educational companies like BQ have developed a browser-based programming environment (Bitbloq***) for its robot Zowi. Modular Robotics has the Cubelets application****to control their robots.
The application presented in this paper differs from the aforementioned in that it is used to program real industrial robots, not robots designed for education. It makes use of the potential of tablet devices to control manipulator robots, allowing to create paths, monitor the status of the robot and even create programs and run them both in a simulator and the robot in real time, wirelessly, which is unusual as most of these robots have wired connections.
The idea of programming robots without first having to know about the syntactic and semantic details of the underlying formalism has been previously seen in applications like ReAct! ;14;, which enables students to describe robots’ actions and change in dynamic domains. This concept is developed in the Hammer tool.
III. Hammer Application as a Learning Tool
Hammer is an Android application designed to control and program industrial manipulator robots ;15;. It is able to create and simulate trajectories, manipulate real robots wirelessly and even create generic programs for (theoretically) any kind of robot manipulator, using visual blocks, avoiding the need for specific robot language knowledge. Consequently, users without a specific knowledge in robotics are able to program an industrial robot.
Hammer was originally conceived for industrial applications, but it has turned out to be a great educational robotic tool to show students the operation of industrial robots and basic notions of programming.
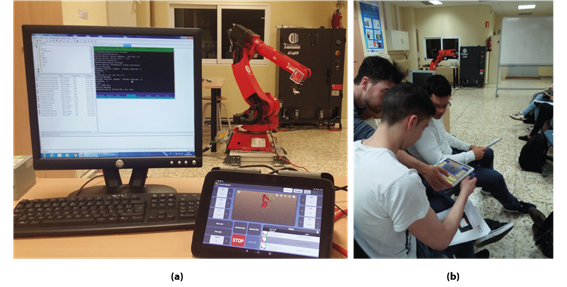
The Hammer environment is composed by the industrial robot to control (in these experiments a Comau Smart-Six), the robot controller and a tablet (in our case a Nexus 10 with the Hammer app running). This scenario is shown inFig. 1 (a). We sometimes use a PC to load programs in the robot, but it is not necessary because the teach pendant can be used instead. The robot must be running a program that acts as a gateway between the robot and tablet. It receives commands from the tablet and translates them into robot-specific language (in this case PDL). Thus, it is possible to use other robots and reuse the application. The only thing that has to be changed is the gateway (to translate commands to the new robot-specific language).
The communication between the tablet and the gateway is done by standard TCP/IP sockets. Thus, WiFi and Ethernet networks can be used.
The application is explained in detail in the paper by Mateo et al. ;15;. For educational purposes we use the teach pendant, the programming IDE and the simulator.
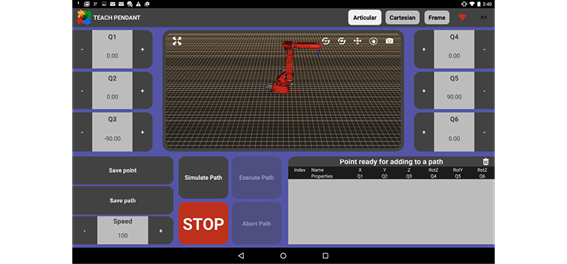
The teach pendant interface (shown inFig. 2) offers a control palette similar to the real device usually found in robotics control units but with an improved, neat and modern interface. Hammer improves the user experience of common teach pendants as it operates wirelessly, allowing the user to walk around the robot and have a clearer view of its position. Furthermore, it has other features such as virtual 3D environment with a model of the real robot synchronized in position and a swipe panel with information about saved points and paths.
This interface allows the user to create points and paths and define the motion properties of them. This is very useful to show students how the robot changes its behaviour depending on the type of point, trajectory and approach. Finally, when the path is generated and configured, the user can simulate it or execute in the real robot.

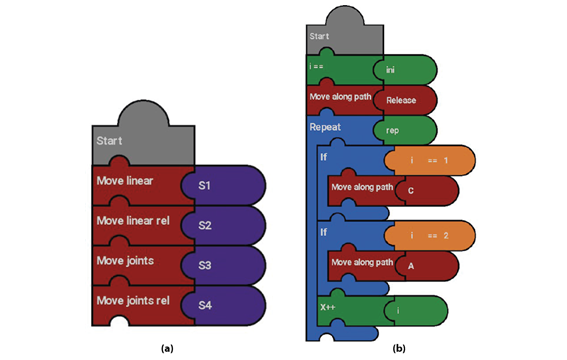
The programming IDE (shown inFig. 3) allows the user to make programs that use the saved points and paths to create more complex tasks or routines. To do so, the visual programming interface provides the user with programming blocks as well as variables, loops and conditionals. The creation of a program is done by sequentially linking one block to another.
Hammer is also able to simulate and execute those programs in the real robot. During the simulation, the user can see the evolution of the program and the variables involved in it, which can be used as debugging tool. When executed in the real robot, the user can see the generated native code by pressing the “PDL” button.
IV. Teaching Trials
To validate the usability and improvement on the user experience, we carried out four practical exercises with students. The purpose of these practical exercises was to validate how easy and fast robot programming is done with Hammer.
We selected three groups with between 10 and 15 students from the Escuela Técnica Superior de Ingeniería y Diseño Industrial (ETSIDI) at the Universidad Politécnica de Madrid (UPM) who were following the robotics module of the third year of the Electronics and Industrial Automation grade. Those students had no previous knowledge of the Comau’s PDL robot programming language nor Hammer, although they had some basics in robotics and C programming.

One robot Comau Smart-Six was used for the practical exercises. The students worked in groups, each with an Android tablet. As they finished a task, they connected the tablet to the robot to test their exercise in the robot. Turns were assigned by the instructor. Because it takes more time to write a program than to execute it, this method allows having several students working with the same robot.
Students were given a 20 min tutorial about Hammer. The idea was to check if, with such a short tutorial, they are able to use Hammer. A picture of the class is shown inFig. 1(b).
Exercise 1: Movement in different coordinate systems and trajectories
The purpose of the first exercise is to teach students the types of movement and how a change in the coordinate reference system affects them.
Coordinate systems:The exercise goal is to follow a square trajectory with four points predefined and move the TCP (Tool Center point) from an initial position to the given points: two of them in Joint coordinates, and the other two in Cartesian coordinates (one with respect to robot base, and the other one with respect to the tool). The exercise ends after simulating the trajectory. The coordinates of the four robot locations are shown inTable I.
Students had to place the robot at the targeted positions using the incremental buttons of the teach pendant interface, alternating between the Joint and Cartesian modes, and selecting if the movement has to be done with respect to the robot base or to the tool. When a targeted point was reached, it had to be saved. Finally, with all the points students had to create a path (exercise1). Once the path was created, the student had to simulate it to validate and visualize the path. If the simulation was successful, the path was ready to be executed in the real robot.
The purpose of this part of the exercise is to teach students the types of movement that a manipulator robot can do. In this way, students could learn how the robot can be moved and understand better the difference between movement in Joint and Cartesian coordinates.
Movement types: When a path is created, the robot arm can reach each of its points by different ways depending on how the movement between points is done. Three interpolation methods have been considered: linear (a straight line in the Cartesian space), circular (the path between two points is an arc) and joint (default joint movement). The idea is that students learn the difference amongst these three movement types.
The goal was to change the trajectory’s properties and set the movement type to each of the options available (linear, joint or circular). Then, simulate the movement and finally execute it on the real robot.
Exercise 2: Orientation interpolation
The purpose of this exercise is to teach students the importance of tool orientation when designing a robot path, and the difference between three types of interpolation. Students can see how the theoretical interpolation affects the final orientation of the tool, something that could be very practical and clarifying for them.
To reach a target position with a specific orientation, the robot can interpolate the tool’s orientation by different ways: world, Euler or wrist joint interpolations (respectively RS WORLD, EUL WORLD and WRIST JNT in Hammer). In world interpolation (two-angles related to the world frame), orientation interpolation is done by linearly interpolating the values of two rotation angles: tool rotation and tool spin. The tool rotation angle is the one created by the common normal between the beginning tool approach vector and the destination approach vector. The tool spin angle is the one created by the approach vector from the beginning position to the destination position. The evolution is related to the World frame independently from the trajectory. In Euler interpolation (Three-angle), orientation interpolation is done by linearly interpolating the values of the three Euler angles of rotation,E1,E2andE3. Finally, in wrist joint interpolation (Wrist-joint), orientation interpolation is done using a combination of joint and linear interpolation. This allows the tool to move along a straight line while the wrist joints are interpolated in joint coordinates.
The starting and ending orientations will be used as taught, but because of the joint interpolation, the orientation during the movement is not predictable, although it is repeatable. For example, using either EUL WORLD or RS WORLD, if the beginning and ending orientations are the same, then the orientation of the tool will remain fixed during the motion. However, with WRIS JNT orientation interpolation, this is not guaranteed. However, WRIST JNT orientation control produces a smoother motion near wrist singularities.
Therefore, in this exercise, students could experience the difference between the three interpolations described above. To do so, the tool offset must be set to default and the reference system must be set to the base. Then, students had to execute the pathExercise2(already created) in the real robot and watch its execution.
TheExercise2path was created with a singularity depending on the kind of orientation of the tool. During the execution of the path, students notice that the path execution stops at the middle due to the singularity as during the interpolation TCP tries to reach an orientation whose joints angles are outside the limits of the robot. It happened because the RS WORLD (World interpolation) property was defined in orientation type. Then, students could try EUL WORLD (Euler interpolation) and WRIST JNT (Wrist joint interpolation) and check the difference.
The final result was that in the previous cases (World and Euler interpolation) the interpolation was done using linear spin and rotation angles, which can cause a singularity, whereas the last case, the interpolation (Wrist joint) was done by joint coordinates, which avoid singularities.
Exercise 3: Robot speed
The goal of this exercise is to show students how speed can affect the trajectory that the robot should follow.
The process of determining which component governs Cartesian speed is called preplanning. This happens just before the motion actually occurs. It is possible to force the preplanner to pick a particular component of motion selecting one of the options. In the application the user has the following ones available:
Joint Speed (SPD JNT): The TCP moves along the requested Cartesian trajectory with maximum speed at (at least) one of its joints. The TCP will not move at constant speed.
Linear Speed (SPD LIN): The TCP moves at the specified linear speed value (m/s), forcing all joints to move at the same time.
Rotational Speed (SPD ROT): It rotates the TCP at the specified angular speed (rad/s), forcing all other components to move at the same time. For this to be applied, different orientation between consecutive points is necessary.
In this exercise, students should execute a path calledexercise3with different speeds. First, at the path properties window, the SPD LIN (Linear speed) option had to be selected and set its value to 0.7 m/s. Students could notice how the robot’s TCP moved at the requested speed.
After that, the speed option had to be changed to SPD ROT (Rotational speed) and set its value to 1.4 rad/s. After that, the path had to be executed to see the difference.
Finally, students had to select the SPD JNT option. In this case, the speed value is not necessary because the robot moves at least one joint at maximum speed, which means the TCP will not move at constant speed.
Exercise 4: Learning visual programming
The purpose of this exercise was to teach students how to make basic programs using the Hammer interface and compare them with the original robot programming language. The exercise was divided into two parts: using motion commands and creating variables and loops.
Using motion commands:The purpose of this part was to show students the main usage of movement blocks. Students had to create a program with four trajectories, each of them of a different type: linear movement with respect to the base, linear movement with respect to the current TCP position, joint movement with respect to the zero angle position and joint movement with respect to the current joint angle position of the robot. The resulting program had to be the same as the one atFig. 4 (a).
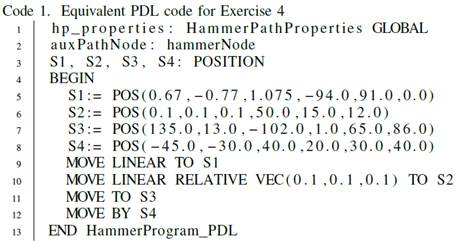
After that, students can see the equivalent PDL code by pressing the button “To PDL” (Code listing 1). In this way, they could compare the code needed to develop the same program in the robot native language.
Creating variables and loops:In the second part of the exercise, students had to create a more complex program where three paths were combined within conditional and repetition loops (Fig.4 (b)). The aim of this program was to move the robot to an initial position, and then create a loop to execute one path or another depending on the iteration number. This exercise requires the use of different kinds of variables to store values, loops to perform repetition and conditional blocks to switch among paths.
When completed, students should simulate it and execute it in the real robot. Showing the PDL code again made them realize this exercise was harder to develop in the robot native language.
V. Results
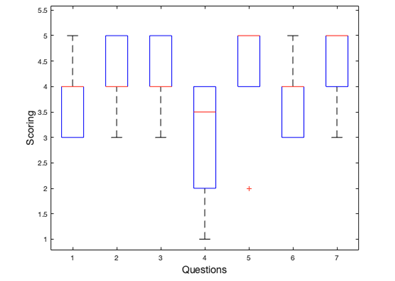
After the practical exercises, students had to answer some questions to evaluate if they think that Hammer has helped them to understand robotics concepts better, such as inverse kinematics, tool orientation, trajectory types and reference systems. All subjects answered to all questions. There was no outlier removal. Questions are presented in the following paragraphs. The scores obtained are summarized inFig. 5.
Did the practical exercises help to understand the different reference systems applicable to a robot and its usefulness when creating trajectories? (1: Not very, 5: Very much).The answers are shown inFig. 6a. More than 94% of the students showed that the exercise helped to understand the different reference systems.
Did the practical exercises help to improve the understanding of the theoretical concepts about the inverse kinematics of robots? (1: Not very, 5: Very much). More than 66% of students showed a better understanding of inverse kinematics, as shown inFig. 6b.
Did the practical exercises help to understand the different types of orientation applicable to the trajectories of a robot and its usefulness? (1: Not very, 5: Very much)The answers are shown inFig. 6c. More than 83% of the students showed that the exercise helped to understand how orientation affects robot trajectories.
Assess the learning curve of the Hammer tool for the creation and programming of trajectories (1: Easy, 5: Difficult).
The answers, shown inFig. 6d, indicate that the learning curve was somewhat difficult for 50% of the students.
Assess the level of interactivity between the student and the industrial robot through Hammer, that is, how well the robot responded to the user requests (1: Low, 5: High). The answers, shown inFig. 7a, indicate that more than 94% of the students consider that the interactivity with the robot is increased using Hammer.
Has your interest in programming or robotics increased after the practical exercises?. The answers, shown inFig. 7b, reveal that more than 66% of the students consider that their interest in robotics or programming would increase by using a tool like Hammer.
Would you recommend the practical exercises for its realization in future courses?The answers are shown in Fig. 7c. More than 94% would recommend these exercises to prospective students.
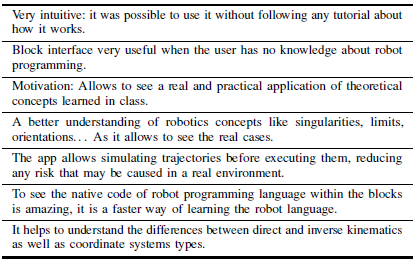
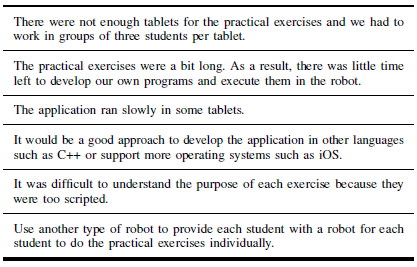
Students also had the chance freely to show their opinions about their experience using Hammer. Their comments are summarized in tables II (advantages) and III (disadvantages).

Fig. 6. Survey results for questions one and four. (a) Did the practical exercises help to understand the different reference systems applicable to a robot and its usefulness when creating trajectories?. (b) Did the practical exercises help to improve the understanding of the theoretical concepts about the inverse kinematics of robots?. (c) Did the practical exercises help to understand the different types of orientation applicable to the trajectories of a robot and its usefulness?. (d) Assess the learning curve of the Hammer tool for the creation and programming of trajectories.
VI. Discussion
As it is shown in the results section, all exercises received a very positive evaluation, obtaining a grade higher that 50% in all cases (considering marks of 4 and 5 points a positive evaluation, 3 points neutral, and 1 and 2 negative). The only question that did not get such a good result was the one about the learning curve. This might be due to the short explanation of the tool (less than half an hour). However, even with such a short tutorial, more than 32% of the students considered the learning curve appropriate. So, the 20 min tutorial seems to be a little short, and we consider too that it would be best to extend it to at least 30 min.
From the student opinions in each group, it can be inferred that most of them have enjoyed the practical exercises and it has helped them to consolidate their knowledge on the subject. According to some students, they assimilated some theoretical concepts that were not understood very well in the theory class. They especially liked the simulation environment because it allows visualization of the trajectories and corrects them if necessary before the robot executes them. It was also very positive about the translator to native robot code, which could ease the learning curve of the robot native programming language.
Most of the drawbacks were due to lack of tablets and incompatibilities with other operating systems. Hammer is only developed for Android, so students who did not have an Android tablet had to meet with students that did have. This problem could be solved either by increasing the number of tablets or developing Hammer in the future for other operating systems, such as Windows or iOS.
Another point that students missed was the dead man device. Because the control program runs in Hammer over a conventional tablet, it lacked the necessary hardware for its implementation. However, it is not a major drawback as motion range of the robot is limited by software to prevent the robot from reaching danger-ous positions (such as the ground). For security reasons, Hammer implements a watchdog. If the robot does not communicate with the tablet for the specified time, the robot stops automatically. All in all, students reported a good responsiveness and interaction of Hammer, as shown inFig. 7.

Fig. 7. Survey results for questions five to seven. (a) Assess the level of interactivity between the student and the industrial robot through Hammer, that is, how well the robot responded to the user requests. (b) Has your interest in programming or robotics increased after the practical exercises?. (c) Would you recommend the practical exercises for its realization in future courses?
In general, the criticisms are purely technical and with an easy solution. The general opinion was quite satisfactory and most of the students understood the theoretical aspects covered by the practical exercises, making Hammer a very useful application to teach robotics.
As a summary, we could say that the test was a success. Many students gave a positive review and consolidated their theoretical knowledge in an entertaining and innovative way. We consider that Hammer is a very useful tool to teach robotics to undergraduate students.
VII. Conclusion
This paper describes a new teaching method for robotics by which students can use an industrial robot through an Android tablet thanks to the Hammer application developed at Universidad Politécnica de Madrid.
Three groups of 10 to 15 students tested the usability of the application. Each group took part in four different exercises where students could create paths and simulate and execute them on the robot.
The practical exercises were focused on the practical application of the knowledge acquired in theory classes, such as differences between direct and inverse kinematics, types of orientation, singularities and how all these parameters affect the trajectory.
The practical exercises provide students with an introduction to basic concepts of robot programming in an easy and interactive way, as they could create robot tasks using a visual interface and see its subsequent execution in the robot. Furthermore, they could see the equivalent robot code that would have been necessary without Hammer.

